
Vegetables
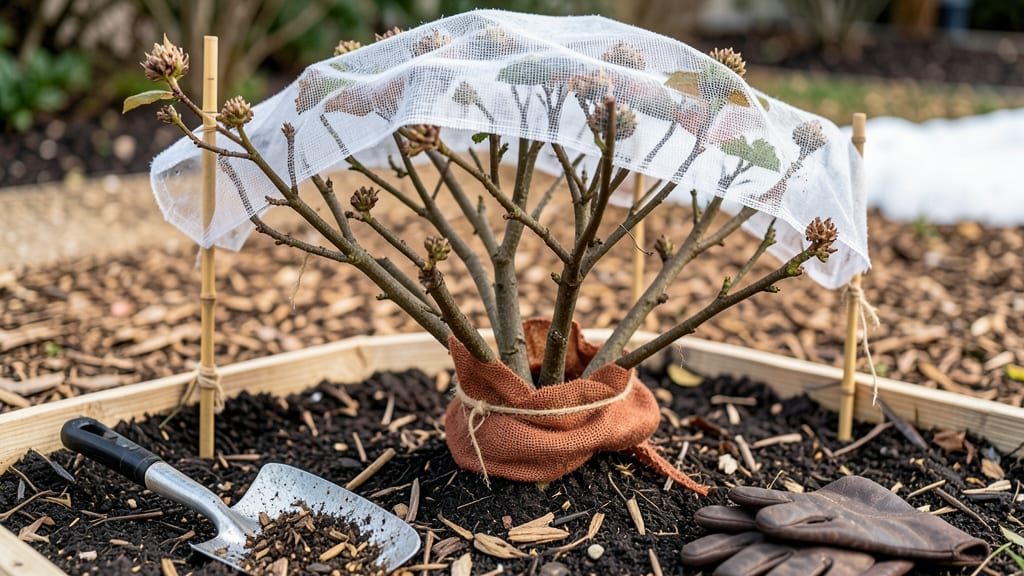
Cold snaps don’t have to mean shrub casualties—shrub winter protection starts with three simple moves before the first frost. 🌿 I’ve watched tender shrubs turn into crispy brown skeletons after a hard winter, but these tricks keep mine thriving year after year.
The key? Mulching, wrapping, and timing watering just right—no fancy equipment needed.
Think of winter prep like dressing for a blizzard: you’re protecting the roots and stems from windburn, dehydration, and temperature swings. A thick layer of mulch (3-4 inches) acts like a blanket, while burlap wraps shield stems from harsh winds.
Even evergreens need help—spritzing them with anti-desiccant spray in late fall prevents that dry, brown look by spring.
By spring, your shrubs will burst back to life with vibrant green growth instead of struggling to recover. You’ll spot the difference immediately: no split bark, no wilted stems, and no gaps where dead branches used to be.
The best part? These methods work for everything from hydrangeas to boxwoods—no matter your zone.
Here’s the secret: start prepping in late October or November, before the ground freezes. A little effort now means lush shrubs that outperform neighbors’ plants every season. Let’s get those shrubs winter-ready!
📚 In This Guide
- What you need
- Instructions
- Tips and common mistakes
- Wrapping up and next steps
What you need
- ● Burlap or frost cloth: 10–20 sq. ft. per shrub (depending on size; opt for breathable 30–50% shade cloth for ventilation).
- ● Mulch: Organic: 2–4 inches of straw, wood chips, or shredded leaves (avoid fresh grass clippings).
- ● Inorganic: 2–3 inches of pine needles or gravel (for well-draining soil).
- ● Pruners or shears: Sharp, clean pair (sterilize with rubbing alcohol).
- ● Garden twine or stakes: For securing frost cloth (if needed).
- ● Watering can or hose: For hydrating before winter (avoid overwatering!).
- ● Anti-desiccant spray: (e.g., Wilt-Pruf) to reduce moisture loss in evergreens.
- ● Reflective bubble wrap: Wrap trunks of young shrubs for added insulation.
- ● Thermometer: To monitor soil temps (ideal: above 20°F for most shrubs).
- ● Garden gloves & knee pads: For comfort during prep.
Step-by-Step instructions for protecting shrubs in cold climates
Cold-hardy shrubs still need strategic care to survive brutal winters—here’s how I’ve kept mine thriving for years.
🌿 Step 1: Assess Your Shrubs’ Cold Tolerance and Timing
First, check your shrubs’ hardiness zones and their specific cold tolerance ratings. Most evergreens (like boxwoods or junipers) can’t handle prolonged sub-zero temps, while deciduous shrubs (like hydrangeas or lilacs) fare better. I always wait until late fall, after the first hard frost but before consistent sub-zero temperatures—usually mid-November in my zone 5 climate.
Look for signs of dormancy: leaves have fallen (for deciduous types) or turned brown (for evergreens), and new growth has stopped. This is your cue that the shrub is prepped for protection. If you wrap too early, you trap moisture and encourage rot.
🪴 Step 2: Prune and Clean Up Debris
Remove any dead, diseased, or crossing branches with clean, sharp pruners—this prevents pests and diseases from hiding over winter. I also rake away all fallen leaves and debris from the base of the shrub, as damp mulch or leaf litter can smother roots and attract voles or slugs.
For deciduous shrubs, a light pruning now helps shape them for spring. For evergreens, avoid heavy pruning—just tidy up to maintain airflow. The goal is to leave the shrub in its most compact, wind-resistant form.
☀️ Step 3: Apply a Layered Protection System
Start with a 3-4 inch layer of mulch (like shredded bark or straw) around the base of the shrub, keeping it 6 inches away from the trunk to prevent rot. Next, wrap the shrub’s stems and branches with burlap or frost cloth, securing it loosely with twine. For extra protection, I add cardboard boxes around smaller shrubs to block wind and insulate further.
For evergreens, sprinkle anti-desiccant spray (like Wilt-Pruf) on the needles to prevent drying. Avoid plastic wraps—trapped moisture leads to rot. The key is breathability: you’re insulating, not suffocating.
⏰ Step 4: Monitor and Adjust Through Winter
Check your shrubs once a month during winter storms. If heavy snow accumulates, gently brush it off to prevent branch breakage. Watch for signs of stress: brown needles on evergreens or cracked bark on deciduous shrubs. If you see wilting or mold, remove the protective layers and air the shrub out for a day.
In early spring, as temperatures rise above 40°F consistently, start uncovering your shrubs gradually. Remove the burlap first, then the mulch, and finally the boxes. This slow transition prevents shock from sudden temperature swings.
✂️ Step 5: Post-Winter Care and Spring Prep
Once all frost risk has passed, inspect your shrubs for winter damage. Prune out any dead or broken branches immediately. For evergreens, trim back any brown, dried-out tips. Water deeply if the spring has been dry—this helps revive roots after their winter dormancy.
Apply a balanced fertilizer (like 10-10-10) in early spring to encourage new growth. I also add a 1-inch layer of compost around the base to replenish nutrients. This step sets the stage for a strong, healthy summer.
Tips & tricks for perfect shrub winter protection
Here's what nobody tells you about keeping your shrubs thriving through brutal winters—these are the lessons I learned after losing too many plants to neglect.
Timing is Everything: That mid-November window in Step 1 is critical for zone 5 climates, but adjust based on your local frost patterns. I check my local weather service for the first hard frost date, then wait exactly one week before wrapping. Too early and you trap moisture; too late and you risk freeze damage. For evergreens, this timing prevents winter burn from prolonged cold snaps.
Pruning Precision: In Step 2, focus on removing only what's absolutely necessary—dead, diseased, or crossing branches. I've seen gardeners over-prune in fall, which stresses the plant before winter. For deciduous shrubs, limit yourself to just shaping up to 1/3 of the plant's volume. The goal is to maintain that compact, wind-resistant form without creating new growth that won't harden off properly.
Layered Protection Secrets: When applying your 3-4 inch mulch layer in Step 3, use a fork to loosen the soil first—this prevents waterlogging when spring thaws arrive. For the burlap or frost cloth, leave the bottom 6 inches uncovered around the base to allow for air circulation. I've found that adding a layer of reflective bubble wrap inside the burlap creates an extra insulating barrier without trapping moisture.
Spring Transition Strategy: That 40°F threshold in Step 4 is your real cue for uncovering, not just calendar dates. I test by leaving a thermometer near the shrubs overnight—if it stays above 40°F for three consecutive nights, it's safe to start removing protections. Remove the burlap first, then wait 3-4 days before removing mulch, which gives the roots time to adjust to warmer temperatures gradually.
Pro Tips for Shrub Winter Protection
- Here's what nobody tells you about keeping your shrubs thriving through brutal winters—these are the lessons I learne...
- Timing is Everything: That mid-November window in Step 1 is critical for zone 5 climates, but adjust based on your lo...
- Pruning Precision: In Step 2, focus on removing only what's absolutely necessary—dead, diseased, or crossing branches...
Frequently asked questions
Got questions about keeping your shrubs happy through winter? You’re not alone! Here are some of the most common concerns—and straightforward answers—to help you prep like a pro.
When is the best time to protect shrubs for winter?
Timing is key! Start protecting shrubs before the first hard frost—typically in late fall (October–November, depending on your climate). If temperatures dip below 20°F (-7°C), act fast. For evergreens, apply burlap or frost cloth once nighttime temps hit 30°F (-1°C).
Can I use mulch alone, or do I need extra protection?
Mulch is a great start (2–4 inches around the base), but tender shrubs or young plants may need more. Combine mulch with burlap wraps, frost cloth, or even straw for extra insulation. Evergreens, like boxwoods or rhododendrons, often need both to prevent desiccation.
What if I forget to cover my shrubs and frost hits?
Don’t panic! Light frost usually won’t harm most shrubs, but heavy ice or prolonged cold can damage tender varieties. If you miss the window, cover them immediately with frost cloth or blankets. Waterlogged soil? Drain excess moisture to prevent root rot.
Are there eco-friendly alternatives to plastic covers?
Try burlap sacks, straw bales, or cardboard boxes (remove labels!) for breathable, biodegradable options. For evergreens, pine boughs or shredded leaves add natural insulation. Just avoid plastic directly on foliage—it traps moisture and causes rot.
How do I know if my shrub is getting too much or too little protection?
Check for signs: Too much? Wilting, mold, or yellowing leaves mean poor airflow. Too little? Brown tips or crispy edges signal frost damage. Adjust by loosening covers on warm days or adding layers during cold snaps. Pro tip: Monitor soil moisture—overwatering under covers can be just as harmful as underprotection!
Wrapping up and next steps
Protecting your shrubs from winter’s chill doesn’t have to be a daunting task—just a few thoughtful steps can make all the difference! 🌿 With the right materials, timing, and techniques, your plants will thrive even in freezing temperatures. Remember: mulching, wrapping, and strategic pruning are your best allies for long-term resilience.
Now that you’re armed with these year-round survival hacks, it’s time to roll up your sleeves and give your garden some tender loving care. Start small: pick one shrub this season to practice your new skills, and watch how it rewards you with lush growth come spring! 🌱