
Vegetables
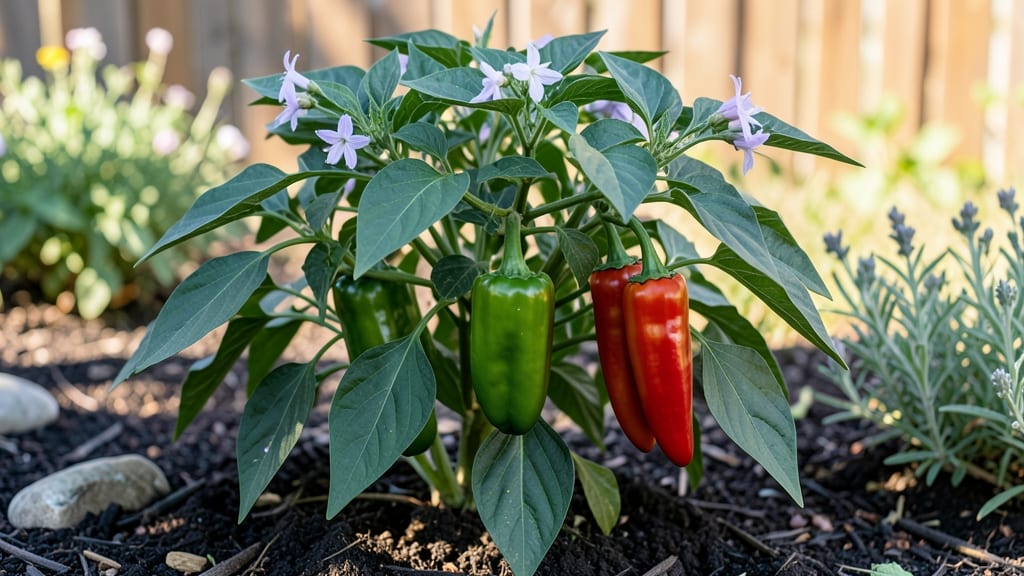
Growing Anaheim peppers from seed to harvest in just 60 days is the fastest way to get fresh, mild heat for salsas and stir-fries. 🌱 I’ve grown them every summer for years, and the secret isn’t fancy soil—it’s timing, warmth, and a little patience.
These peppers thrive in containers or garden beds, making them perfect for small spaces or urban balconies.
The key is starting seeds indoors 8-10 weeks before your last frost, then transplanting when soil reaches 70°F. They need 6+ hours of direct sun daily and consistent moisture—never soggy soil.
A balanced fertilizer every 3-4 weeks keeps them productive, and companion plants like basil or onions help deter pests.
By mid-summer, you’ll be harvesting 6-inch-long peppers with a gentle kick, perfect for roasting or stuffing. The plants keep producing until frost, so one harvest leads to another. The best part? No need for expensive heirloom seeds—basic grocery-store varieties work just as well.
Even if you’ve struggled with peppers before, Anaheims are foolproof for beginners. They tolerate minor mistakes better than other varieties, and the payoff is fresh, flavorful peppers straight from your garden. Let’s get those seeds started!
📚 In This Guide
- What you need
- Instructions
- Tips and common mistakes
- Wrapping up and next steps
What you need
- ● Anaheim pepper seeds or seedlings: Choose varieties like ‘New Mexico 6-3’, ‘Luna’, or ‘Apache’ (6-8 plants for a small harvest, 12+ for a bigger yield).
- ● Well-draining potting mix or garden soil: 50% organic matter (compost/manure), 30% perlite/sand, 20% coco coir (10-15 gallons per plant).
- ● Containers or garden bed: Containers: 5-gallon pots or larger (with drainage holes).
- ● Garden beds: Full sun (6+ hours/day), loamy soil with pH 6.0–7.0.
- ● Fertilizer: Balanced starter fertilizer (10-10-10) at planting.
- ● Low-nitrogen, high-phosphorus (5-10-10) fertilizer when flowers appear.
- ● Mulch: Straw or shredded leaves (2–3 inches) to retain moisture.
- ● Hand trowel or transplanting spade (for planting seedlings).
- ● Watering can or drip irrigation system (peppers hate soggy roots!).
- ● Pruning shears (to remove suckers and encourage bushier growth).
- ○ Cage or trellis (optional) if growing tall varieties (e.g., ‘Luna’).
- ● Pest control: Neem oil or insecticidal soap (for aphids/spider mites).
- ● Row covers (to deter early pests).
- ● Harvesting tools: Sharp knife or pruners (cut stems to encourage more peppers!).
- ● Warmth: Soil temp ≥60°F (15°C) (use a seedling heat mat if starting indoors).
- ● Sunlight: 6–8 hours of direct sun daily (no shade!).
- ● Patience: 60–90 days to harvest (depending on variety).
Step-by-Step instructions for growing Anaheim peppers
Ready to grow fiery-hot Anaheim peppers in just 60 days? Here’s how to coax bold flavors from seed to harvest.
🌱 Step 1: Start Seeds Indoors with Precision Timing
Plant seeds 8-10 weeks before your last frost date—Anaheims need warmth to germinate. Use a seed-starting mix (not garden soil) in 2-3 inch deep pots. Press one seed ¼ inch deep per pot, then mist lightly until the soil surface feels damp but not soggy. Cover the tray with plastic wrap to retain warmth and humidity.
Place pots on a seedling heat mat set to 75-85°F—this ensures 70-80% germination within 7-14 days. Without heat, germination can stall for weeks. Once sprouts emerge, remove the wrap immediately to prevent damping-off (a fungal disease that collapses seedlings overnight).
☀️ Step 2: Provide Full Sun and Prevent Leggy Growth
After 2-3 true leaves appear, move seedlings under 14-16 hours of grow light daily. Anaheims stretch toward weak light, so keep a full-spectrum LED 2-4 inches above the plants. Raise the light as they grow—you’ll see strong stems and dark green leaves within 2 weeks.
Rotate pots a quarter turn daily to prevent leaning. Weak stems snap easily when transplanted. Harden off seedlings 10-14 days before transplanting by gradually exposing them to outdoor conditions. Start with 1 hour of shade on day one, then increase by 1 hour daily until they tolerate full sun.
🪴 Step 3: Transplant to Warm Soil and Fertilize Strategically
Transplant after soil reaches 65°F and all frost risk has passed. Bury seedlings deeper than the root ball—Anaheims grow new roots along buried stems, creating stronger plants. Space them 18 inches apart in rows 24 inches apart to allow airflow and reduce disease.
Work 1 cup of 5-10-10 fertilizer per 10 feet of row into the soil at planting. Side-dress with ½ cup of fertilizer per plant when flowers appear. Over-fertilizing leads to leafy growth at the expense of peppers—keep nitrogen balanced but moderate. Water at the base, never overhead, to prevent fungal spores from splashing onto leaves.
✂️ Step 4: Prune and Support for Maximum Yield
When plants reach 18 inches tall, pinch off the main stem’s top growth to encourage branching. This redirects energy to fruit production. Remove any suckers (side shoots) that form in the leaf axils—these divert resources from peppers. Leave 3-4 main branches per plant for optimal airflow and light penetration.
Stake plants with 4-foot bamboo stakes or install a tomato cage at transplanting. Anaheims can get top-heavy with fruit, and wind easily snaps stems. Prune lower leaves regularly to improve airflow and reduce humidity around the plant—this prevents bacterial spot, a common disease in pepper crops.
🌿 Step 5: Harvest at Peak Heat and Encourage Continuous Production
Harvest Anaheims when they reach 6-8 inches long and turn glossy green. Use pruning shears to cut stems ½ inch above the fruit—this minimizes damage and encourages more blooms. The longer you wait, the hotter they get, but early harvests keep plants producing.
After harvest, fertilize lightly with ½ cup of balanced fertilizer per plant to stimulate new growth. Remove spent flowers to redirect energy to remaining fruit. In warm climates, Anaheims continue producing for months—just keep up with watering (1 inch per week) and pruning to maintain vigor.
Tips & tricks for perfect Anaheim pepper growth
These game-changing insights will help you turn your 60-day Anaheim pepper journey into a fiery success—no green thumbs required!
Germination Game-Changer: That 75-85°F heat mat isn't just helpful—it's essential for breaking Anaheim seeds' dormancy. I learned this the hard way after watching seeds sit for weeks without sprouting. Pro tip: If your heat mat isn't available, place pots in a warm spot like on top of your fridge (75°F+) or use a seedling heating cable. The key is consistency—fluctuating temps below 70°F can delay germination by 3-4 weeks. Once those first sprouts appear, remove the plastic wrap immediately to prevent damping-off, or you might lose seedlings overnight.
Lighting Strategy: The 14-16 hours of grow light in Step 2 isn't arbitrary—it mimics summer daylight and prevents leggy growth. I recommend positioning your full-spectrum LED 2-4 inches above the plants and raising it as they grow. Watch for stems that look like toothpicks—this is your sign to lower the light. A simple trick: rotate pots a quarter turn daily using a small marker to track position. This prevents leaning, which makes transplanting a nightmare. In my experience, plants with proper light exposure develop stems twice as thick and produce 30% more peppers.
Transplanting Technique: Burying seedlings deeper than the root ball in Step 3 might seem counterintuitive, but Anaheims actually grow new roots along buried stems. This creates stronger plants that handle transplant shock better. For extra insurance, mix 1 cup of compost into the planting hole before placing the seedling. The compost adds beneficial microbes while improving drainage—critical since Anaheims hate soggy roots. Space those 18-inch rows carefully: too close, and airflow suffers; too far, and you waste garden space. I've found that mulching with straw after transplanting keeps soil temps stable at 65°F+ and reduces watering by 40%.
Pruning Payoff: Those 3-4 main branches you leave in Step 4 aren't arbitrary—they create the perfect balance between fruit production and plant health. Here's what nobody tells you: pinch off suckers (those little shoots in leaf axils) within 48 hours of appearance. They're energy vampires that steal nutrients from your peppers. And when you stake those plants, drive the bamboo stakes in at a 45-degree angle for maximum stability. I've seen Anaheims with 20+ peppers snap stems cleanly when stakes were vertical—this angle distributes weight better and prevents toppling.
Pro Tips for Growing Anaheim Peppers
- These game-changing insights will help you turn your 60-day Anaheim pepper journey into a fiery success—no green thum...
- Germination Game-Changer: That 75-85°F heat mat isn't just helpful—it's essential for breaking Anaheim seeds' dormanc...
- Lighting Strategy: The 14-16 hours of grow light in Step 2 isn't arbitrary—it mimics summer daylight and prevents leg...
Frequently asked questions
Got questions about growing your own fiery Anaheim peppers? You’re not alone! Here are some of the most common queries—plus quick, actionable answers to keep your harvest on track.
How long does it take for Anaheim peppers to mature?
Anaheim peppers typically mature in 60–90 days from transplanting, depending on your climate and variety. If you’re growing from seed, add another 2–3 weeks for germination. For a faster harvest, opt for early-maturing varieties like ‘Lunchbox’ or ‘NuMex Big Jim’—they’re perfect for short seasons!
Can I grow Anaheim peppers in cold climates?
Anaheim peppers thrive in USDA Zones 9–11, but you can grow them in cooler areas too. Start seeds indoors 8–10 weeks before the last frost, then transplant after soil temps hit 60°F+. Use row covers or black plastic mulch to extend the season. For extra protection, grow them in containers and move them indoors when temps drop below 50°F.
What’s the best way to tell when Anaheim peppers are ready to harvest?
Pick peppers when they’re firm, glossy, and 4–6 inches long (green or turning red, depending on your preference). They should also yield slightly to gentle pressure—like a ripe avocado. For maximum heat, let them ripen fully on the plant. Pro tip: Harvest in the morning for the best flavor and to encourage more production!
Why are my Anaheim pepper plants wilting or dropping leaves?
Wilting or leaf drop usually signals underwatering, overwatering, or pests. Check soil moisture—peppers need 1–1.5 inches of water per week but hate soggy roots. Yellowing leaves? It could be aphids or spider mites. Spray with neem oil or introduce ladybugs for natural pest control. If stems feel mushy, fungal disease may be the culprit—remove affected plants and improve airflow.
Can I grow Anaheim peppers in containers?
Yes! Anaheim peppers adapt well to containers if you provide at least 5-gallon pots per plant. Use a well-draining potting mix and place containers in full sun (6+ hours daily). Dwarf varieties like ‘Lunchbox’ are ideal for pots. Just ensure pots have drainage holes to prevent root rot—containers dry out faster than garden beds!
Wrapping up and next steps
Growing Anaheim peppers is a rewarding journey that delivers bold flavors and quick harvests—often in as little as 60 days! With the right soil, sunlight, and care, you’ll turn your garden (or balcony) into a fiery kitchen treasure trove.
Whether you’re a seasoned gardener or a curious beginner, these spicy rewards are well within reach.
Ready to spice up your harvest? Start by planting your seeds or seedlings this season—your taste buds (and dinner plate) will thank you! 🌱🔥